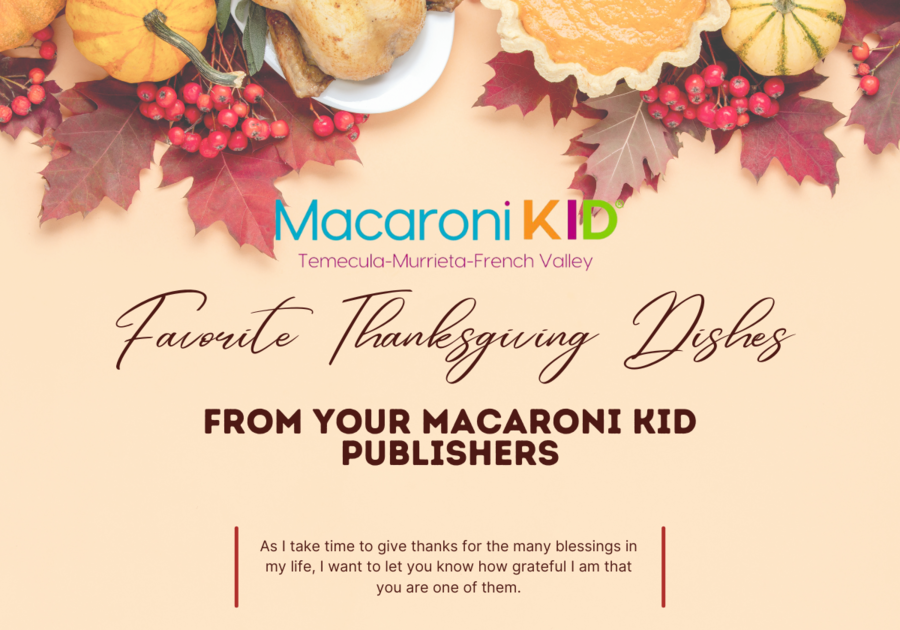
This Thanksgiving, we just wanted to share a little bit of each of our Thanksgiving traditions with you all. All 3 of your publishers come from such diverse backgrounds, we thought it would be cool to share one dish from our Thanksgiving meal that is unique to our family and something we can't leave off our Thanksgiving menu each year. We'd love to see your favorite Thanksgiving dishes. Share them with us by tagging us on our Instagram Page.
| Publisher Ashley Cunningham |
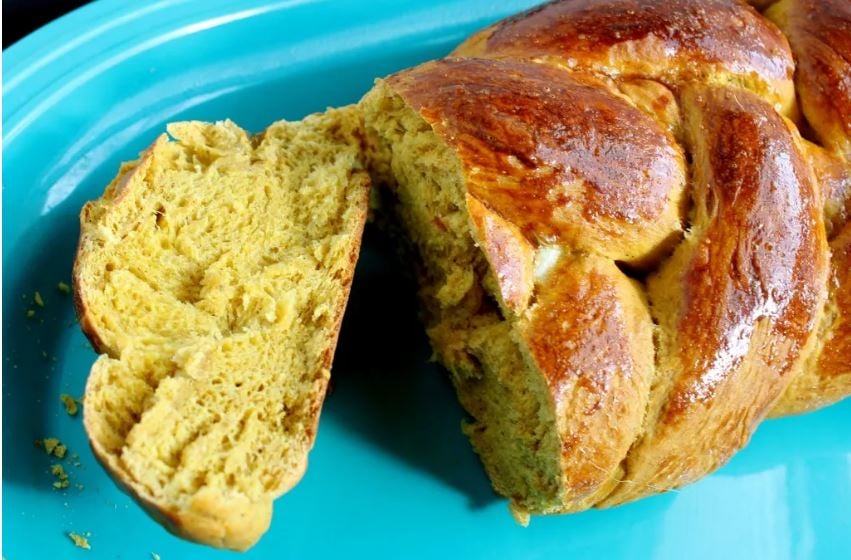
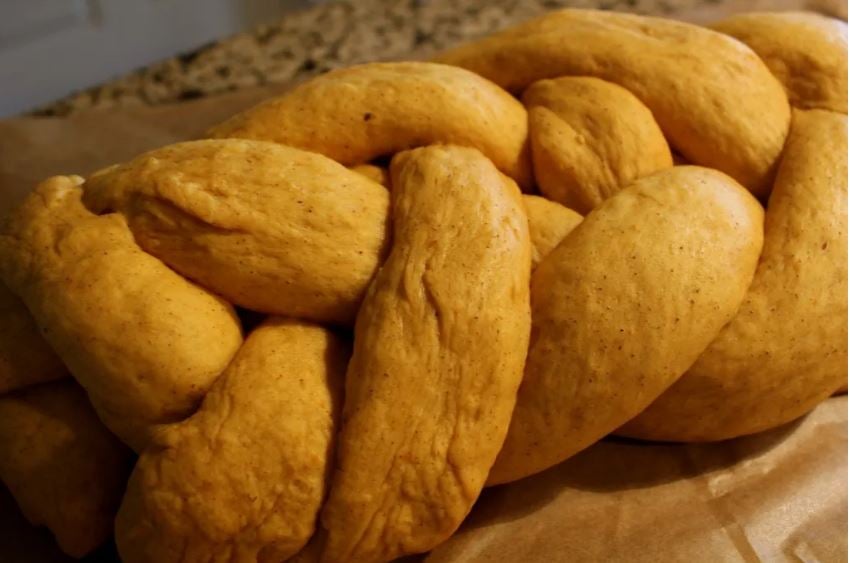
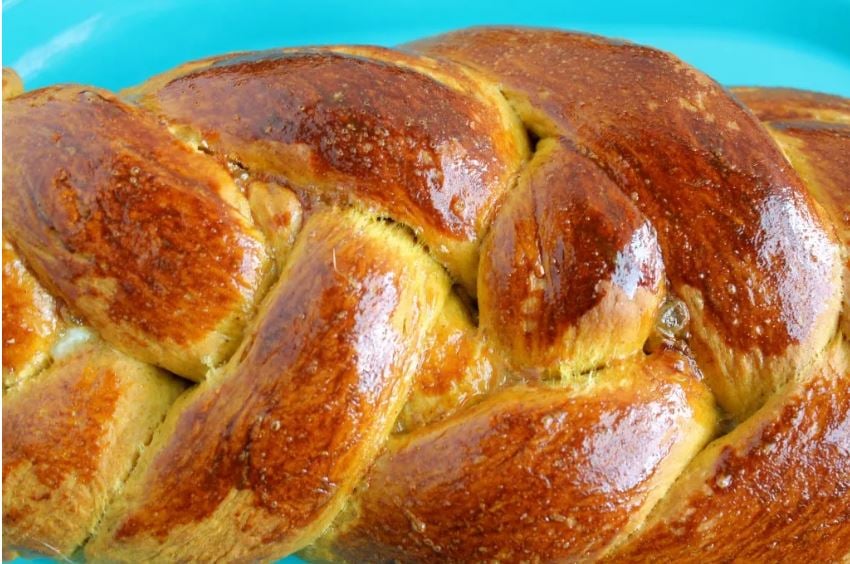
I love Thanksgiving. The food, of course, is some of the best around. Turkey. Mashed potatoes. Cranberry Sauce. All topped with gravy! My mom taught me to use the leftover “gravy sauce” from the turkey pan and I’ve never stopped! Remember Thanksgivukkah? When Hanukkah and Thanksgiving overlapped for the first time in forever and the last time in 70,000 years or so? Yeah. It was the best food day ever. So now I aim to recreate the Jewish/Thanksgiving mashup every year. Because you want challah in your stuffing. Trust me. How do you combine Thanksgiving and Jewish food?? Pumpkin Challah is our favorite so far and good all year long! A cinnamon spicy pumpkin flavored challah for fall! You can make one bigger challah or two smaller challot. P.S. Challah makes the best french toast!
 |
PREP TIME: 6 hours 45 minutes mins
COOK TIME: 35 minutes
TOTAL TIME: 7 hours 20 minutes
SERVINGS: 1 -2
Ingredients:
- 1 package active dry yeast about 2 1/4 teaspoons
- 1/2 cup warm water about 110 degrees F
- 1/2 cup granulated sugar plus 1 teaspoon
- 1 cup pumpkin puree
- 1/4 cup vegetable oil
- 1 teaspoon vanilla extract
- 2 teaspoons pumpkin pie spice
- 1 teaspoon cinnamon
- 1 egg + 1 egg yolk for the dough whisked and 1 egg yolk for the glaze
- 4 - 4 1/2 cups bread flour or all-purpose flour, plus more as needed you may need a little more or less
- 1 1/2 teaspoons salt
- Pumpkin seeds poppy seeds, sesame seeds, etc for garnish
 |
Instructions:
1. Let's start with the yeast! Place it in a large mixing bowl for a stand mixer and whisk with warm water and 1 teaspoon sugar (that helps activate the yeast). Let yeast stand until it foams and puffs up, about 10 minutes. If it doesn’t get foamy, your yeast is bad or the water wasn't the right temperature, so try again!
2. Then, using the whisk attachment for the stand mixer, mix in the remaining sugar, pumpkin, oil, vanilla, 1 egg and 1 egg yolk into the yeast mixture. Then add spices and combine and gradually add 3 cups flour and salt and either with a hook attachment using an electric mixer on medium speed or a spoon and your hands until combined. Knead for about 5-10 minutes, adding flour as necessary. Dough should be sticky, and finish kneading by hand on a counter until dough is smooth. Dough will get less sticky as you knead. Dough should be soft, smooth and slightly tacky.
3. Place the dough in a bowl greased with oil and cover. Let dough ferment in a warm place until it has at least doubled in size, about 2-3 hours. I put mine on top of a oven heated to the lowest temperature.
4. Now, time to braid! Place the dough on a lightly floured surface and punch down. To make 2 challot, divide the dough in half, and keep one half covered. Divide each half into three equal pieces, and stretch out into three strands.
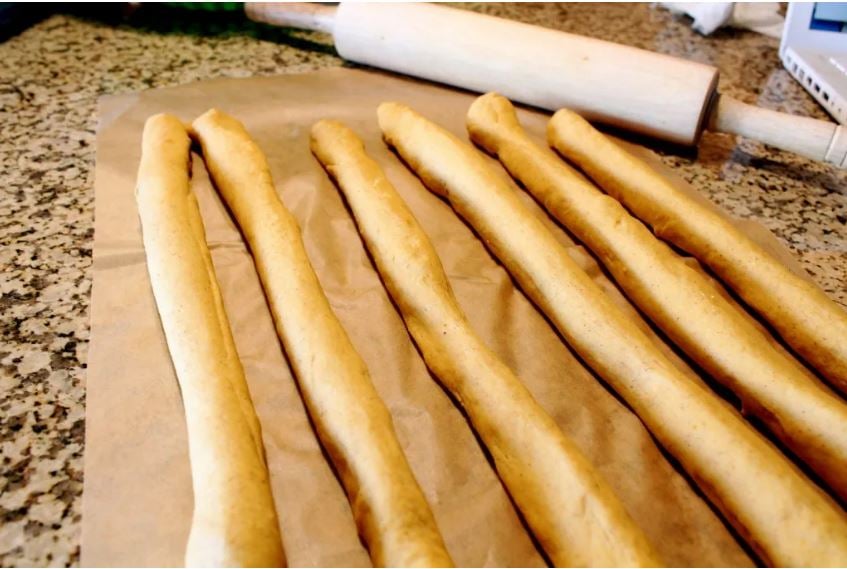 |
5. Secure the three strands at one end and braid until you reach the other end, then tuck the other pieces underneath the challah to secure. Repeat with other half.
 |
6. Carefully place the loaves on two parchment lined baking sheets, cover lightly with plastic wrap, ferment another 45 minutes or so until it's light and fuffy looking (exact proofing timing for challah will depend on environmental conditions.)
 |
7. Meanwhile, preheat oven to 350 degrees F. Which the last egg yolk with 1/2 tablespoon of water and brush generously over challah. Repeat to have two coats an sprinkle with seeds. Bake for 30-35 minutes, or until golden brown and with an internal temperature of 190 degrees F, rotating pans halfway through. (Flip around and switch rack position.) If the challot start to brown too fast, cover with foil until done.
 |
| Publisher Arielle Parfait |
In our family we have the influence of multiple cultures between both my husband and I. He's from Lousiana and I'm from Hawaii and we have about 8 or so different nationalities between us. This cultural diversity changes what we make for Thanksgiving almost every year depending on what we're feeling like eating or whether or not we are with family or on our own for Thanksgiving.
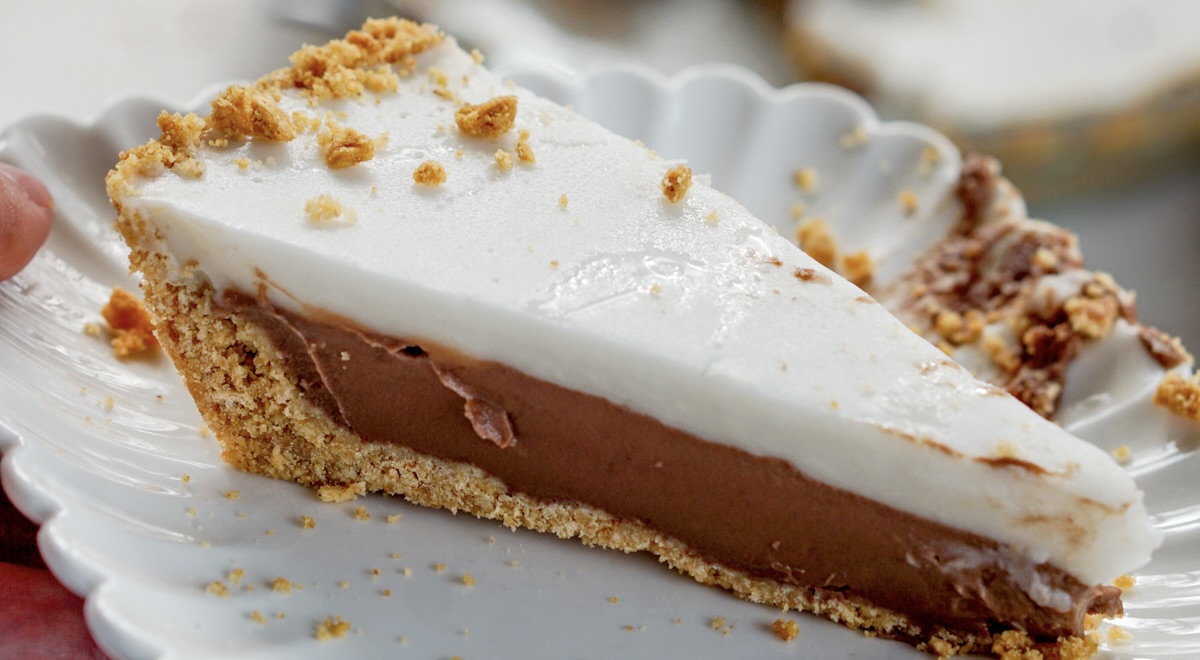
However, we really love having Chocolate Haupia(Coconut pudding) Pie for dessert. This dessert is something that I have always loved growing up in Hawaii and I love sharing it with my family during the holidays. It's a way to still feel connected to my island roots despite no longer living there.
It's a super simple dish to make but tastes cool and refreshing after all of the heavy Thanksgiving dishes.
 |
Ingredients:
You only need a few simple ingredients:
- One 9-inch pie crust (I like using graham cracker crusts)
- 1/2 cup water
- 5 tablespoons cornstarch
- 13 ounces unsweetened coconut milk (full-fat ONLY)
- 1/4 cup sugar
- Jell-O brand Chocolate Pudding mix
- Cool Whip
I love the graham cracker crust since you don't have to bake it. Just make sure you don't break it 😉 before getting your pie filling.
Instructions:
1. Cook the chocolate pudding mix as it specifies for pie filling. This is important to note as it will be thicker than regular pudding. It usually has these instructions on the side of the box. If the instructions are not on the box, here they are:
Make Pudding
Open (5.9 ounce) package of instant chocolate pudding mix.
Pour pudding mix into large bowl.
Measure 2 ½ cups of milk in liquid measuring cup. Add to pudding mix.
Mix pudding filling with whisk for 2 minutes. (Set timer)
2. Add the chocolate pudding filling to your pie crust. Let cool.
3. Make your Haupia next.
4. Combine cornstarch and water in a small bowl. Stir until cornstarch is dissolved then set aside.
5. In a medium-sized saucepan over medium heat, combine coconut milk and sugar. Whisk constantly until mixture begins to simmer.
6. While continuing to whisk, SLOWLY pour in the water/cornstarch mixture until it thickens. Reduce heat to low and continue to whisk until you have a thick, pudding-like consistency. This is important, it needs to be thickened while it is heating or it won't set up.
7. Pour enough of this coconut pudding mix over the chocolate pudding filling and let it sit out for 10 minutes to cool. Leave some room at the top of your pie for the whip cream topping. If you have leftover, pour that into a small container to eat on its own once it sets.
8. Put the pie to continue to set in the fridge for about two hours. Once it is set (It will be more solid and no longer pudding like, you can top the whole pie with Cool Whip Whipped Cream.
9. You can enjoy right then or put it away with a pie cover over it for later. These pies keep for about 2 days max.
| Publisher Charlene Lee |
Military families like ours have to often find alternatives to celebrating holidays, such as spending the holidays with local friends rather than family. Sharing a meal together during the holidays brings a familiar sense of comfort and joy when family is far away.
Regardless of how you celebrate the holidays, whether traditionally or nontraditionally, the important thing is “togetherness.” The years apart has especially taught me the incredible value of taking a day to simply be grateful. Military families learn very quickly the importance of having a village, no matter where this life takes them.
The holidays look a little differently for us, and it can definitely be tough being so far from family. However, it can also inspire some new family traditions. For example, this year our family is choosing to eat a Chinese dish called Siu Yuk rather than a turkey.
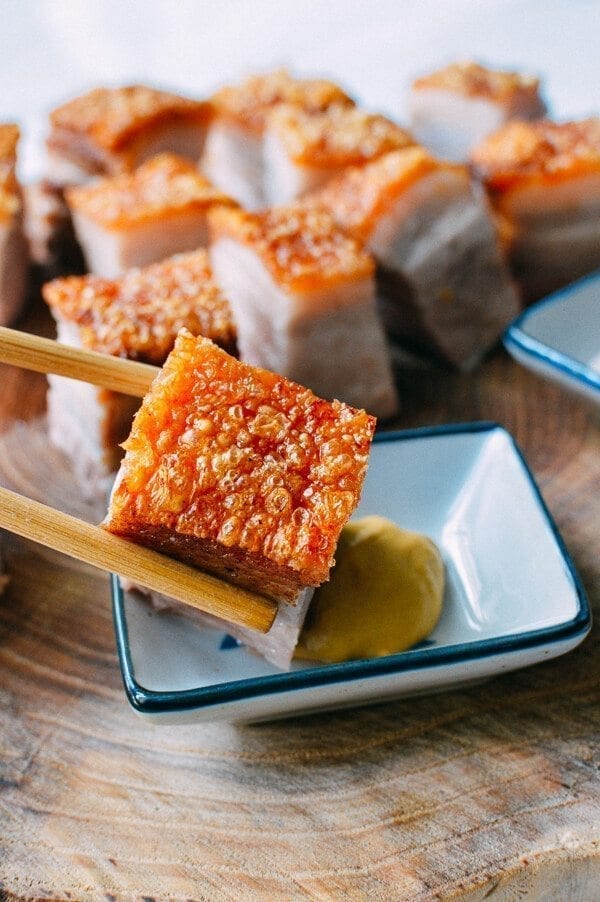 |
CANTONESE ROAST PORK BELLY (SIU YUK) RECIPE
Ingredients
- 3 lb slab of pork belly
- 2 teaspoons Shaoxing wine
- 2 teaspoons salt
- 1 teaspoon sugar
- 1/2 teaspoon five spice powder
- 1/4 teaspoon white pepper
- 1 1/2 teaspoons rice wine vinegar
- 1/2 cup coarse sea salt
Directions
- Rinse the pork belly and pat dry. Place it skin-side down on a tray, and rub the Shaoxing wine into the meat (not the skin). Mix together the salt, sugar, five spice powder and white pepper. Thoroughly rub this spice mixture into the meat as well. Flip the meat over so it’s skin-side up.
- So, to do the next step, you'll need a sharp metal skewer. Systematically poke holes ALL over the skin, which will help the skin crisp up, rather than stay smooth and leathery. The more holes there are, the better, really. Let it dry out in the fridge uncovered, for 12-24 hours.
- Preheat the oven to 375 degrees F. Place a large piece of aluminum foil (heavy duty foil works best) onto a baking tray, and fold up the sides around the pork snugly, so that you’re creating a kind of box all around it, with a 1-inch high border going around the sides.
- Brush the rice wine vinegar on top of the pork skin. Pack the sea salt in one even layer over the skin, so the pork is completely covered. Place in the oven and roast for 1 hour and 30 minutes. If your pork belly still has the rib attached, roast for 1 hour and 45 minutes.
- Take the pork out of the oven, turn on the broiler to low, and position the oven rack in the lowest position. Remove the top layer of sea salt from the pork belly, and unfold the foil. Put the pork back under the broiler to crisp up. This should take 5-10 minutes. The broiler should ideally be on “low” so that this process can happen gradually. If your broiler gets pretty hot, be sure to keep the pork as far away from the heat source as possible. Keep a close eye on it to prevent burning!
- When the skin has puffed up and gotten crispy, remove from the oven. Let it rest for about 15 minutes and then slice.
- Eat! Now here’s the most difficult part of the process—control yourself from eating too much in one sitting. I’m kidding, there’s no need for control when it comes to siu yuk. Eat, and give in to glorious gluttony!
 When visiting events and local businesses, be sure to tell them Macaroni KID sent you... and don't forget to tell all your friends!
 |  |  |